Site and floor plans can be: PDF, JPEG, PNG, or SVG.
32 MB
The maximum width and height is 6,000 pixels.
Yes! To replace your floor plan image, visit your project’s plan management page and select the floor plan you wish to edit. Click “edit”, then “choose file”, select your new image, and save.
Yes! At the bottom middle of a floor plan is a white location marker with a plus sign. Press, drag and drop the location marker to the new location. Tapping the marker once will highlight it blue. Once highlighted, connect to the 360 camera and take a picture. The white marker will turn yellow. Repeat this process as necessary.
Yes! Tap the marker (blue highlight) that you want to move. Then press the marker, drag and drop to new location.
White location markers do not have an associated image. Yellow location markers have associated images.
When you leave a floor plan or the app, the app will disconnect from the 360° camera to conserve the 360° camera battery.
Tap the menu bar (top left). Go to Advanced Features and make sure the toggle switch for Environmental Data Sensor is turned on.
Make sure the environmental sensor is turned on by pressing the sensor bottom and verifying a green light on the side. If you do not see the light, the sensor battery may be dead.
Make sure Bluetooth is turned on in your mobile device. The Bluetooth connection to the sensor will not show in your mobile device. However, the app will use the sensor to record environmental data.
Yes, for iOS, press and hold the location marker. For Android, tap the marker then the floor plan icon (upper right corner) then edit in the bottom ribbon. You can edit the marker name, add a note or import media to the marker.
Make sure you have a solid Internet connection then press the ‘sync’ button in the app to sync all 360° images, and data to Control Center 9.
EarthCam University has a virtual VR Site Tour class every Wednesday at 4:00PM EDT. Please register online here: https://www.earthcam.net/services/earthcam-university/
As an EarthCam client, Control Center Vault is an FTP client that contains all end-of-project deliverables including all project floor plans, images, and environmental data. All data is organized by floor plan.
Yes! Tap once (location marker will highlight blue) then long press on the marker to lift and move to a different location.
360° Camera
VR Site Tour is compatible with the Ricoh Theta Z1 and Z1 (51 MB).
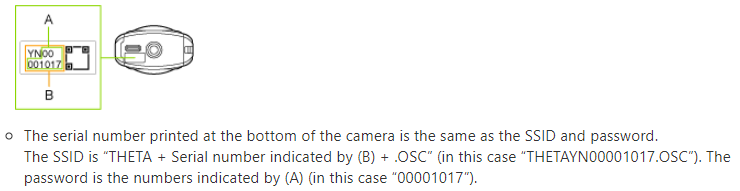
The 360° camera connects to your mobile device via Wi-Fi Direct. The Wi-Fi password is the numbers from the serial number located on the bottom of the 360° camera.
On the side of the 360° camera, long-press (4 seconds) the Wi-Fi/Bluetooth button to turn on/off Bluetooth. A short-press (1 second) will turn on/off Wi-Fi.
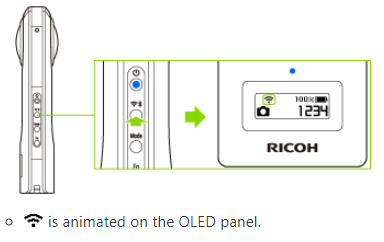
Theta Z1 LCD – the Wi-Fi logo will be solid when Wi-Fi is on. This light does not mean there is an active connection with a mobile device. Verify in your mobile device if there is a Wi-Fi connection.
No, Bluetooth on the 360° camera should be turned off. VR Site Tour only uses Wi-Fi to connect to the 360° camera. Having Bluetooth on in the 360 camera will drain the battery faster.
Download the Ricoh Theta app and use it to take an image. This will sync the date and time on the 360° camera.
The 360° camera USB data transfer plug-in is active in the 360° camera and should be turned off. To turn off, hold down the mode button on the side of the 360° camera until the plug-in menu appears. Press the Mode button until Exit Plug-in is highlighted. Hit the Shutter button to confirm and exit.
Make sure the 360° camera battery is charged.
Make sure Wi-Fi is on in your mobile device.
Make sure Wi-Fi is on in the 360° camera.
Only one Wi-Fi Direct connection to the 360° camera is possible. Make sure another mobile device is not connected to the 360° camera.
In the mobile device settings, forget the 360° camera Wi-Fi network and then reconnect with the numeric password.
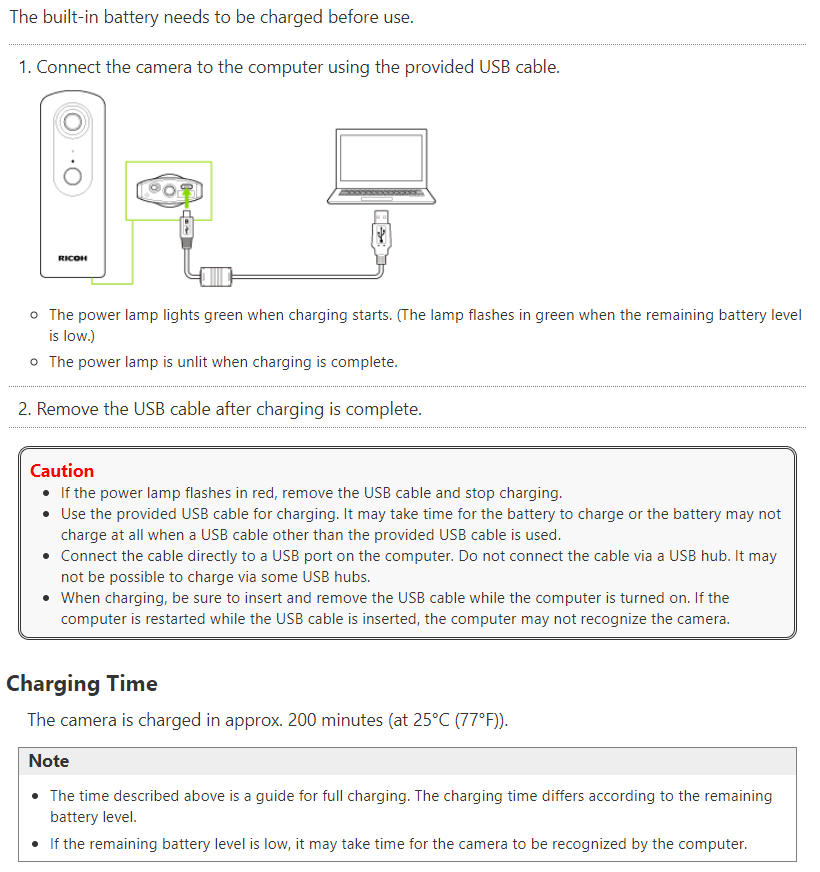
Connect the 360° camera to a computer using the included USB-C cable. The power lamp on the side of the camera lights green when charging, and turns off when fully charged.
Yes, an external battery pack with an output of 5V, <1 Amp can be used to extend the life of the 360 camera.
Images can be taken from as far away as 200 feet with clear line of site. Inside, a maximum distance of 30 feet should be observed. This distance may vary depending on the interior physical environment.
Maintaining the same direction when taking images will create a guided tour that has the same orientation for each location marker.
Use the monopod to maintain a consistent height regardless of user height. Use the level to ensure the 360° image is plumb to the ground.
The threaded rod is screwed in between the top of the monopod and the bottom of the 360° camera to create additional height.
With the extension rod, the aperture of the camera will be approximately 71” above the ground.
Our highly trained staff is here to assist you.
Phone: USA and International +1-201-488-1111
Control Center: Log in & select the bell icon on your camera to request support.